Sunday, April 17, 2011

ISM3004 Tutorial Blog 4: The different basic RAID types

ISM3004 Tutorial Blog 4
The different basic RAID types
by: Courtney Jeffries

In my final blog post for ISM3004, I would like to discuss the differences of basic RAID types. RAID stands for Redundant Array of Independent Disks and it is designed to increase storage and reliability through redundancy.


RAID 0- this is the simplest RAID level, and it does not involve redundancy. Without redundancy, this level has the best overall performance characteristics of the single levels, especially when it comes to cost. It has become inscreasingly popular for performance seekers.


RAID 1- this level uses mirroring, meaning its drive has data duplicated on two different drives. If one drive fails, the other continues to function. It is popular for people who want fault tolerance and do not care as much about performance.


RAID 2- with this level, very high data transfer rates are possible. It works by splitting the data at the bit level and spreading it over multiple redundancy and data disks. It is rarely used today because of high costs and it requires many drives.


RAID 3- data is striped across multiple disks at byte level. Parity is also calculated and sent to a parity disk.


RAID 4- this level improves performance by striping data across multiple disks in blocks, it also provides fault tolerance through a parity disk. It is like RAID 3 except that instead of bytes, it uses blocks. From byte to block striping improves access performance.


RAID 5- this is one of the most popular levels, it stripes both data and parity information across atleast three drives. It is similar to RAID 4 except that it can exchange the dedicated parity drice for a distrubuted parity algorithm, which writes data and parity blocks across all of the drives used. It has improved writing performance allowing better parallelism. Fault tolerance is also maintained.


RAID 6- this level is basically RAID 5 plus more. It stripes blocks of data and parity across many drives except that is calculates two sets of parity information. The goal is solely to improve fault tolerance. It can handle failure of and two drives while other levels can handle one fault at most. It is worse than RAID 5 in terms of writes because of the added overhead of more parity calculations, but it may be slightly faster.

Sunday, April 10, 2011

Secure Email Project Blog; ISM3004; Courtney Jeffries

Secure Email Project Blog; ISM3004
by: Courtney Jeffries

Here is a screen capture of my Thunderbird inbox:


Web Article:


This article talks about a group of hackers that hacked into the computers of HBGary Federal, which is a security company that sells investigation services to other companies. The wikileaks hackers posted tens of thousands of emails that appeared to be of HBGary's internal company, on the internet. It looked as if these documents contained information for ways to undermine adversaries of Bank of America and the U.S. Chamber of Commerce; for example posting fake background research on their critics to embarrass them.

A spokesperson for Bank of America said they had never hired HBGary and were unaware of the presentations that were made involving them. Since these hacked e-mails were on a file-sharing network, blogs have been retrieving and discussing them all over the internet, as well as in The New York Times.

A power-point presentation was also released that claimed that three companies, HBGary, Palantir Technologies, and Berico Technologies were coming together to attack Wikileaks, who were rumored to have internal e-mails from Bank of America. The three companies planned to submit fake documents to Wikileaks and then expose them as forgeries. Other documents proposed ways to embarrass adversaries of the Chamber of Commerce, asking for an initial $200,000 and later $2 million. These e-mails revealed the chamber's opposition to the Obama healthcare plan.

HBGary made the statement that it had been a victim of a cyberattack and the documents found had been falsified. The two other businesses that were mentioned along side of HBGary put out statements to distance themselves from HBGary Federal, but did not say whether or not the documents were fake.

The article ends with a quote from chamber spokesperson Tom Collamore saying, "The leaked e-mails appear to show that HBGary Federal was willing to propose questionable actions in an attempt to drum up business, but the chamber was not aware of these proposals until HBGary’s e-mails leaked".

This article proves the point that it is important to secure your e-mail to protect important information that you may not want others to know about!

Sunday, April 3, 2011

My Avatar, ISM3004, Courtney Jeffries

My Avatar, ISM3004
Courtney Jeffries

Creating my avatar was a fun experience. I tried out a couple of the different sites listed, but decided that I liked Doppelme the best. I found this site easy to use, and you did not have to sign up in order to create your avatar which I liked. I had never created an avatar before, but this site was not complicated at all which was helpful for me. After comparing it to a few other sites I found it to be the simplest one to use. Here is my Avatar:


I created her to resemble myself with long and wavy brown hair, green eyes, and I put her in an outfit that I would also wear! Overall, I am happy with the way that she turned out!

Sunday, March 27, 2011

Tutorial 3: Computer Viruses and How to Stay Protected

Tutorial Blog 3 ISM3004: Computer Virus' and How to Stay Protected
by: Courtney Jeffries


A computer virus is simply a program that copies itself and infects a computer. Using a code it can attach itself to a program or file and then spread from computer to computer. They might even try to damage your hardware or software also. These viruses can range from mild to destructive, much like a virus can affect the human body; some are worse than others.


Common Types:

There are two main types of computer viruses; Trojan Horses and Worms. The first, the trojan horse, gets its name from Homer's Illiad and just as the trojan horse appeared as a gift in the story, they appear to the computer user to be useful software. Once your computer has been infected, this virus becomes very dangerous because it allows intruders access into your personal files and your privacy. To avoid this virus, be aware of the files you are downloading and make sure they are from a reliable source.


The next type of virus, worms, are designed to copy and multiply themselves from one computer to another, automatically. Worms are far more complex than trojan horses and can spread over corporate networks through email. The best way to protect yourself from a worm virus is to make sure your security software is always up to date, and avoid opening emails that seem out of the ordinary.


How to tell if you have a virus:
  • Your computer is running slower than usual
  • Stops responding or locks up
  • Crashes and restarts every few minutes
  • Restarts on its own and is running different than usual
  • Applications are not working properly
  • Unusual error messages pop up
  • An antivirus program has been disabled for no reason
  • A program that was once installed is gone
  • Disk drives will not open
  • New and unfamiliar icons appear on the desktop

How to Stay Protected:
  1. Make sure the firewall on your computer is turned on
  2. Make sure your operating system is always up to date
  3. Always keep updated anti-virus software installed
  4. Keep antispyware software installed

Database Project Blog; ISM3004

ISM3004: Database Project Blog Post
By: Courtney Jeffries

After completing the database project I feel like I am much more familiar and comfortable using Microsoft Access. Before starting this project, I was worried because even after watching all of the lecture videos, it still seemed like it might be a challenge. There were times that I got stuck, but it was mainly just little issues like sorting the data in the query, and creating a footer in the report. I noticed that going back over the videos and also referring to the class discussion section seemed to really help me and thankfully I managed to find a solution to all my problems without too much stress. Overall, I would now feel comfortable and prepared to help others with problems they might encounter while using Access, and I think that is the number one thing that I have learned.

One way I would enhance the functionality of the database would be, in the report section for example, not having so many page view options. For me personally and others who might not be as familiar with Access, it can get confusing trying to figure out what all these views are for. The report section has four different views to choose from, and even though they can be useful, for a beginner it just seems confusing and I found myself going back and fourth trying to figure out what each view was for, and getting lost in one view when I should have been in a different one. This is really the only thing I found to be a bit annoying. When it came to the more complicated stuff like actually creating a query, form or report, I found the wizard to be extremely helpful and it was probably my favorite part of the whole project.


Sunday, March 6, 2011

Presentation Blog Project: ISM3004; Courtney Jeffries

Presentation Blog Project: ISM3004
by: Courtney Jeffries

I chose to do my presentation PowerPoint on the Susan G. Komen non-profit organization; which supports breast cancer research. I felt that my presentation had a logical flow to it and was easy to understand. One improvement I though of after watching a few other students presentation however was that I could have included a bit more research information. For the most part I feel like I answered questions well about what the cause is supporting and what the cause does to show their support.

In order to catch the audience attention I talked about how Susan G. Komen was diagnosed with breast cancer at the young age of 33. One improvement I could have made was to ask the audience more questions, but I do think I did a good job of giving enough information to answer any questions. I felt my context was clear and to the point; my goal was to make it easy for everyone to understand and I feel I accomplished that.

I validated claims by providing the research about the foundation and what they do. I had no typos or errors in my presentation and made sure to double-check my work to make sure of that. I did not feel that my presentation had much clutter but when I looked at some other presentations I noticed a few of them did not have as much on their slides as I did, so maybe to some people it could have appeared slightly cluttered. I did however make sure it had a neat flow. To ensure readability, I made sure to list the main facts on my slides but I also made sure to add additional information when I presented the presentation myself.

Thanks to my presentation I myself learned a lot about the Susan G. Komen foundation that I did not know before. I knew that they supported breast cancer research but I did not know how much actual money they have actually raised in hopes to finding a cure. Also, I was not aware of how many ways the foundation has helped to reach out and teach women about breast cancer who may be unaware that they should have yearly mammograms, etc. in order to prevent the disease. Finally, I was pleasantly surprised to see how many well known companies support and promote the foundation.

Here is a link to my presentation on the Susan G. Komen foundation!

Sunday, February 20, 2011

Tutorial 2, ISM3004: How to copy files onto a CD

Tutorial 2: How to Copy files onto a CD
by: Courtney Jeffries
ISM3004

Step 1: Insert a writable CD into your computer. A window will open up asking what you would like to do, click "Open writable CD folder" and OK.


Step 2: There should be a folder window showing your blank CD; leave it open on the screen. Go to "Start" and then "My Documents". Right click on the files or folders you would like to copy and click "Copy".


Step 3: Go to the window containing your blank CD and click the "Edit" - paste.


Step 4: Once all of the files you want have been added to the window, go to "File" - "Write these files to CD". A CD writing wizard should pop up on the screen, give your CD a name and click "next".


Step 5: The CD wizard will begin to copy your files onto the CD. Once they have all been copied, click "Finish".


Sunday, February 13, 2011

Excel Project: ISM3004, Courtney Jeffries

Excel Project: ISM3004
by: Courtney Jeffries

While working through the excel assignment, there were many points where I wanted to give up because I got discouraged from not understanding something right away. Through further exploration of the excel discussions on the website however, I was able to find the answers to most of my questions and after a couple hours, completed the assignment.

One skill I became more familiar with during this project was using the various excel formulas. At first I kept getting confused on what formulas to use for each question but when I eventually figured them all out it was very relieving! Another excel item that I now feel comfortable with is the pivot table. Much like learning how to ride a bike or any other skill, once you know, you know! I was intimidated when we were first shown how to work through a pivot table but after a few practice tries, I now feel completely comfortable, almost as if I could fill one in with my eyes closed!

The only thing that still continues to confuse me is for the second pivot table we were asked to turn the decimals into percentages. When I proceeded to do that, my percentages went up to about 8,000 which clearly was not correct. I tried to go back and see where I could fix my mistake but I continued to get lost and just left the numbers as decimals since I procrastinated and have been working on the assignment for a few hours. Hopefully I did everything else correctly and will not lose too many points!

Here is the screenshot of my chart, even though the decimals are supposed to be percentages:


Sunday, January 30, 2011

Tutorial 1: ISM3004; How to use an External Hard Drive on your PC

How to use an External Hard Drive on your PC
by: Courtney Jeffries, ISM3004

First of all, an External Hard Drive is a hard disk placed outside of the computer case. This allows expandability even if a computer's drive bays are full, and also provides an easily removable form of mass storage with very large capacity (networkdictionary).


Here are some easy steps for using an external hard drive on your PC:

Step 1:
Connect the external hard drive to your computer and it will begin installing. You should then be alerted that new hardware was detected.


Step 2:
Your computer may ask you if you want to "allow" the new hardware. If so, register your hardware at this time.

Step 3:
Next try to run a simple test on your hard drive by creating a new document and saving it to the external hard drive. Once it has been saved, try opening the document from the hard drive. If you are able to open the document, your hard drive installation was successful and you can begin transferring original files from your internal hard drive onto your new external hard drive.


Works Cited:

"Computer and Networking Hardware Dictionary - E." Network Dictionary. Web. 30 Jan. 2011. <http://www.networkdictionary.com/hardware/e.php>.

Sunday, January 16, 2011

Tutorial 1, ISM3004: How to successfully install and run a program for microsoft

How to Successfully Install and Run a program for Microsoft
by: Courtney Jeffries, ISM3004

Step 1:
Before installing a program onto your computer there are a few basic things you need to make sure of. You first need to check to see if the computer matches the requirements that go along with the program you are trying to install. (Also something to remember is to close all other windows or programs you may already have opened on your computer, this will allow the new program to install in a more timely manner.)

Step 2:
Once the disk has been inserted into your computer, most software will automatically prompt to a setup screen. If this is the case, you will then click the "run" button to start the installation process.


If you do not immediately see the setup screen however, the disk may not include this feature, in which case you would:

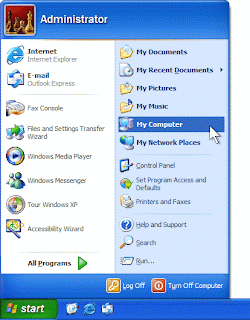
  1. Click on "START" in the bottom left corner of the screen and open My Computer.
  2. Once in the my computer window, open the installation files drive. This drive will contain all your files.
  3. You will then see either a setup or install file. (If there is more than one file, look for the application file or check each until you find the one that begins with installation.) Double click on your file and the installation process of your program will begin.  

Source